Introduction
This tutorial is the first in a series covering feedback in synthesis and production, and how it can be a fun way to create new and interesting sounds with a seeming life of their own. Exploring feedback techniques can bring a complexity and uniqueness of sound to your tone palette, it is a sound with internal coherence so it might appear more “natural” than other types of synthesis or effect. If you are the type who learns by dismantling a working example, then there is a downloadable example file at the end of this tutorial.
What can I make with feedback?
The types of outcomes you can create with feedback range from Dub style delays, to no-mixer synthesis, to looping evolving ambient soundscapes.
here are three audio examples of the sound of feedback
Dub delay
Regenerative looping
A no-input mixer
In this first tutorial I will focus creating the Dub Delay and a little bit of regenerative Looping. The tutorial also shows you the basics which can be used in all of these cases, this involves activating feedback in Ableton Live’s effect return channels and showing you how to progressively reshape the sound produced until you have a unique effect. I’ll explain some pitfalls to avoid which we should bear in mind as our experiments become more complex. In later tutorials I will cover feedback matrices and automation, intermodulation and other more advanced topics.
A “Dub Delay”
A short history and explanation
In the recordings of Lee “scratch” Perry, King Tubby, and others, there is a very recognisable echo sound which has come to be recognised as the “Dub Delay”. Often the effect device used was a very simple type of analog echo device known as a bucket brigade delay, however the notable sonic features which made the distinctive dub sound was NOT inherent in the delay device itself but in the way it was routed. This is what we will recreate.
Traditionally the way to incorporate effects returns on an analogue mixing board would be to have a send dial on each track (such as Drums), the effect send dial would send a percentage of the track signal out to the delay device, the effected signal would return back into the mixing board onto a dedicated return channel. This return channel was a very simple channel with no EQ, or any other features common to the rest of the mixing board tracks. The return channel could not send to other effects.
What Lee Perry (and others) did was to route the effect output of the Delay unit into a normal track channel, thus allowing the effected Delay returns to be EQed and even sent back to themselves using the effect sends, delay-eq-delay-eq-delay-eq-…. . Additionally it meant that the mixing engineers could now send delay into reverb, or reverb into a flanger and then into the delay. This allowed the creation of very flexible feedback loops which could quickly get out of control and start making chaotic noises, but a skilled operator could manage this chaos into art.
For some examples of Dub Delay in songs you can listen to a few in the dub section of my music shop
This is precisely what we intend to recreate.
Step one – make a feedback channel
Activate Ableton’s feedback mode
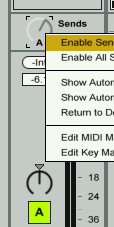 In Ableton Live we have a (possibly) unique ability to allow return channels to send back to themselves and each other, but by default you will notice that the return channel send dials are deactivated, this is to prevent users encountering unavoidable issues. We need to activate the return channel send dials for our experiment to work. Create a new return channel and title it “dub delay”, in that new channel right click on the send dial which would send back to itself and choose “activate send” from the context menu.
One thing you should understand is that by allowing Ableton Live to send effects back to themselves we have chosen to make plugin latency calculation for this special track almost impossible, so Live will no longer do PDC on tracks with feedback activated. I will explain further in the section titled “warnings”
The basic effects
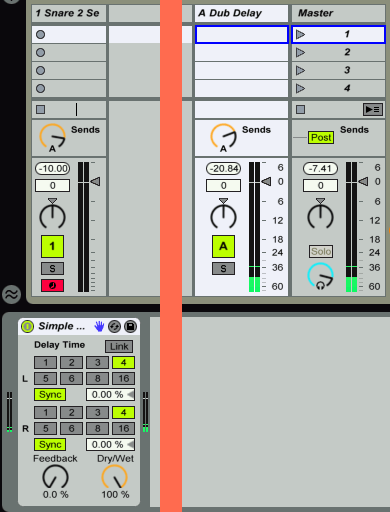
Now find the “simple delay” device and drop it into this track, turn the wet/dry on the effect to 100% wet and VERY IMPORTANTLY turn the feedback down to zero. The reason for that is we are going to take care of the feedback signal path, we are taking that away the effect. Set the left and right sides to the same speed.
In a normal delay effect device path the audio comes in and this input gets sent to a “buffer” where it is delayed for a specified amount of time and then this wet signal is mixed into the dry signal and output. The feedback control sends an amount of the delayed signal back into the input so that is delayed once again, and that mix appears at the output and again is sent back to the input.
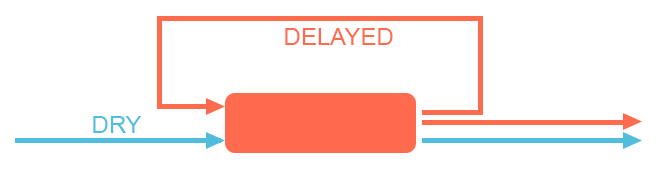
That closed loop is no use to us if we want to take control of feedback tonality. We need to inject our own toys into the loop so we have much more shaping control over the outcome.
You will need a sound source as we proceed, and I recommend any kind of snare-drum. Load a snare into any channel and use the effect send dial on that channel to send to your “dub delay”
Your set-up should look a little like this and when you trigger the snare drum you should hear several echo repeats. If you only hear one the turn up the send (feedback) on the Dub Delay return channel.
Step two – Start shaping the sound
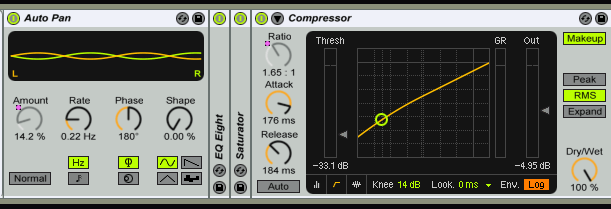
Now that we have a sound source and a basic effect channel we can begin shaping the sound. So get an EQ 8 and a Saturator device from the browser and insert them after your delay effect in the Dub Delay channel. Use the analogue saturation curve/mode and increase the drive to 10db. On the EQ8 to cut a little top and bottom as shown here

Now when you play your snare drum you should hear a subtly different kind of delay sound, as each repeat is progressively saturated and muffled by the EQ8 it will seem a lot less digital and a lot more analog. You should be aware that the amount of feedback you are hearing now relies on not just the send dial in the Dub Delay track, but also the Saturator drive – because the drive increases the volume and so increases how much signal is sent back to the input of the Dub Delay
Experiment a little before we move on but I advise you lower the remember that the Mute button of the Dub Delay channel is your friend in case of emergency!
You can try adding a new EQ8 boost frequency in the mid-range and alter the frequency of this mid-range boost as the notes come in. Now play the snare drum and you will hear the dub delay will start to sound quite extreme the mid range boost and the saturation combine to make a penetrating repeating sound.
Step three – motion and compression
If we try to emulate a dub delay we need to look at tape compression and also at adding a little movement, some emulation of wow and flutter, perhaps even tape noise.
For the compression you should set the lookahead parameter to 0ms, for reasons explained in a later section *(Warnings).
The Autopan effect will make for a good method of adding stereo movement, and you will find that the outcome is quite different to the one you might expect from previous uses of autopan where it produces a very definite panning of the output. When Autopan is inserted into a feedback chain the stereo positioning is layered, rather than absolute.
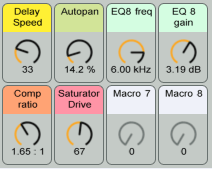
Now that we are starting to build a comprehensive Dub Delay we ought to rack the whole things and assign some Macros so that it becomes more controllable.
The controls to map are the Delay speed, the EQ8 boost and the EQ8 frequency, the compression ratio, and the Saturator drive and also our new Autopan Depth.
Step four – get weirder
Now that we have a basis we can build a more interesting effect by putting more variation in the signal path.
With each cycle of feedback adding more “reflections” to whatever you put in there we can create all kinds of interesting effect. Adding a Flanger or chorus device can diffuse the feedback interestingly and add some automated motion. Alternatively you could try adding a Frequency Shifter to add motion to the feedback. This effect is commonly confused for a “pitch shifter”, but in fact is a very different sort of device and can add interesting subtle movement and stereo width when used in a feedback path.
But be aware that as we add more devices you now have to be more careful in order to balance the feedback and the output volume as the devices increase the output the feedback can increase too . For example when I tried adding a Resonator and a flanger I needed to lower the feedback send (the send dial on the Return track “Dub Delay) to prevent screaming!
You will learn to balance all of the different gain amounts to get the effect you want.
Take a listen to a feedback path with a Frequency shifter in the chain, as pictured above
Advanced manipulations
To emulate the fluctuations of a (mistreated) tape delay we could introduce some pitch instability.
To do this switch the mode of the Simple Delay to Time so that the display shows milliseconds. Also you can link the left and right side. Importantly to get the sound of a tape moving unsteadilly we need to set the mode of the delay to “repitch” which means that when we change the delay speed the alterations are repitched rather than crossfaded. We want that pitch wobble.

If you own Live suite you will have access to the Max for Live LFO device and may like to map the LFO to the time parameter of the delay.
Side note : Personally I think it’s a travesty that a useful basic device like the LFO requires the troublesome Max for Live, but this is the situation we have.
Step Five – get longer
now we come to creating our own longer loops, phrase looping. So far we have been using delaytimes of milliseconds, or of sub-bar beat-sync divisions … now we start to look at what happens when we use lengths of two bars or more.
We can add length to the delay buffer by simply inserting another Simple Delay effect inline. Usually when you add two delays inline it does not extend the delay time but merely repeats one more time, in the case of our special feedback track you will discover this is not the case. So insert another Simple delay and set both of your sync delay times to “16”, that is : two one bar Delays.
In the example which follows I have created a two bar drum pattern clip which plays once – and then the Dub Delay “looper” plays repeats of the two bars. The feedback loop effect settings are a little extreme so that you can hear the difference between the first two bars coming straight from the drum track and where our Dub Delay looper takes over and each loop around progressively degrades the signal in the loop as it passes through the saturator, compressor and the frequency shifter.
You can add more unusual effects into this long loop and use them to take a loop into becoming an unusual soundbed, or take a simple synth sound into a huge layered pad. In the next tutorial in this series I’ll cover a little bit more about additive resynthesis, then in the third and possibly final part I will delve into the deeper waters of the feedback matrix and the no-input mixer to create innovative pulsating soundscapes.
Warnings, or things to bear in mind
There are some areas to be aware of. As mentioned earlier feedback tracks cannot calculate latency offsets. Most basic Devices have zero latency but in Live 9.2 and up there is a new facility to see the latency of each device on the little status bar at the bottom. This will help you see if a device is going to be a big problem in a feedback loop *(because it might go out of time)
So that means if you put a compressor with lookahead=10ms in there each feedback loop will gain 10ms and the echoes will go out of time. Likewise your favourite beat-mangling plug-in will very likely slip off the beat if it has a lot of latency involved in the processes it does. The simple thing to remember is: choose plugins with limited latency, or accept the inevitable consequences. Don’t plop Ozone6 on there and expect crisp timing and start complaining!
 Download Ableton Live Set : feedback – Dub delay example
This example file contains a Max for Live LFO but it is not essential and the project should load without it, and all other items (such as the drum kit) are from the Live Core library