Tag: operator

  • Ableton’s Operator – 13 advanced tips

    Ableton’s Operator – 13 advanced tips

    Ableton Operator is a small FM synth which comes with Ableton Live Suite. Operator may seem limited to familiar traditional FM sounds but it is capable of much more. Here I show thirteen advanced tips and a few ways to use Operator’s lesser known features to create bigger sounds. and a few you might not expect, ranging from deep rumbly analog-style basses, evolving leads and pads.

    1: Make oscillators morph from sine to “sawtooth”

    The oscillators can be set in various FM modulator / carrier routings, but if an oscillator has no modulator input then the oscillator feedback parameter becomes available. Setting an oscillator waveform to sinewave and turning up the feedback parameter will feed the sine wave pitch back on itself and you will hear the sine morph into a waveform which sounds and looks quite similar to a sawtooth.

    This waveshaping effect is is dependent on the oscillator amplitude (as amplitude induces feedback), so turning the oscillator up will take the waveshape closer to a “Saw”, turning it even higher will make it  distort toward noise, and turning the amplitude right down will take the waveshape closer to the original sine.

    The oscillator amplitude is obviously affected by its (amplitude) envelope and by all the other modulation sources mapped to oscillator amplitude – LFO, Aux envelope, modwheel, after touch, etc.  meaning you now have deep control over the waveshape of these oscillators.

    Of course – morphing a sawtooth wave into a sine wave is very similar to what a lowpass filter does it removes high harmonics – but the benefit here is that each of the four oscillators can independently vary from saw to sine, as if you had 4 independent filters (or 5 if you count the filter itself !).  Additionally the smooth interaction between volume and waveshape gives a good almost natural physical modelling feel to the waveform. It’s a unique sound.

    2: Invert harmonics for hard to reach waveshapes (a Triangle wave)

    Operator has a very handy method of drawing your own waveshape with partials and you will be able to get clues for how common waveforms look as harmonics by studying the built in waves.  Not all waveshapes are possible with the basic approach. The reason for this is that harmonics also have a phase relationship, a fundamental might be oscillating up while the third partial is oscillating downwards (180 degrees out of phase). This is the case with the humble Triangle wave.

    The basic additive waveform drawing system of Operator does not allow for drawing harmonic phase relationships but we can emulate out of phase partials by using a second oscillator with a waveform phase offset.  50% of offset is 180 degrees of phase difference.

    A triangle wave contains the same odd numbered partials as a square wave – yet is plainly very different in sound.  In a triangle wave the phase of the upper partials is 180 degrees out of phase with the fundamental. You can see in this image that Oscillator A is handling one group of harmonics (1,5,9,…) and the second oscillator (B) is taking care of the harmonics which are inverted. Combining these two oscillators together allows us to create a waveform with harmonics with relationships which are out of phase with each other. In this case we make a Triangle wave, but the same principle allows other (otherwise unavailable) waves.
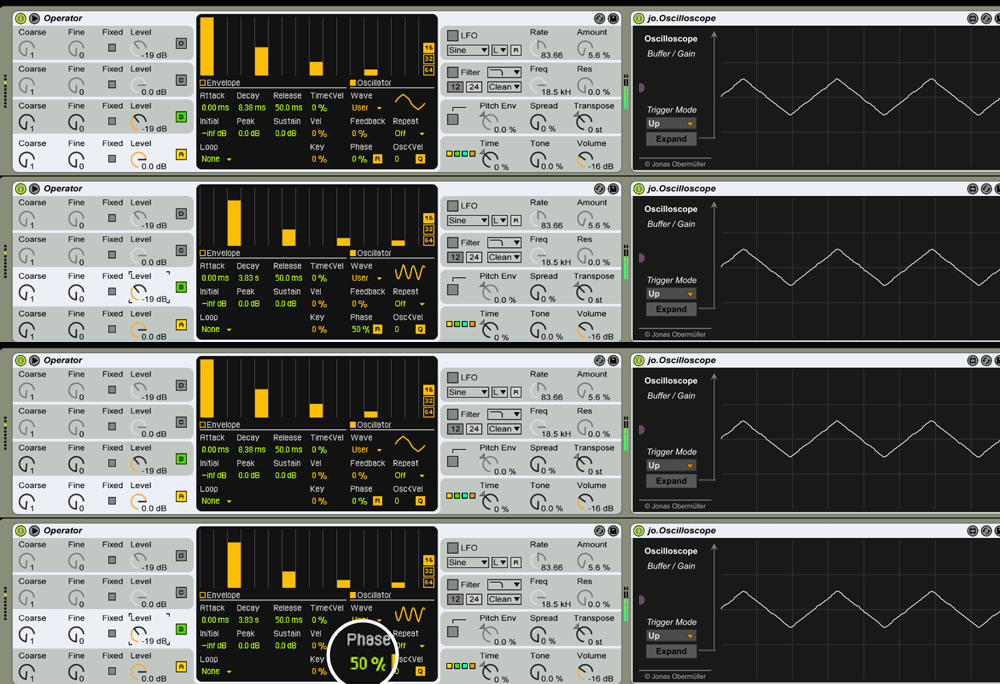
    Notice that PHASE INVERSION on the B oscillator which is what makes our complex triangle output.

    Triangle / Square wave morph

    In the above GIF we can see what happens if we make oscillator D a copy of oscillator B but turn in Oscillator D make sure to reset the phase parameter of that oscillator down to 0, and then by using the LFO to crossfade between these two variations (B and D) the wave changes between a triangle and a “square”.  the same principle can be used to create more complex harmonic shifting effects. See tip 5 for more on this.

    (more…)

  • Free Ableton Live Pack – Xmas Presets

    Free Ableton Live pack.  To celebrate the festive season here’s a bunch of FREE & amazing instrument racks featuring Ableton’s Operator instrument

    Ten free Instrument Racks for Ableton Live

    These racks come from an upcoming  Now Available pack called Vintage Operators, which uses Ableton’s Operator synth to make vintage inspired synth sounds reminiscent of the 1970s and 80s.   Yes, it’s a weird idea.  The full pack contains over 120 live racks featuring Operator with 21 leads, 28 basses, 34 “keyboard” patches, FX synth patches and more.

    Anyway, that’s another story, here’s your Xmas Presets (Free!)

    ableton set Download Free Ableton Live Pack

    xmas-advert

    Audio Preview

    The Presets

    1. Sub Dub Bass 4 – A deep bass guitar, potentially used in Dub but in the audio demo I play something a bit funkier with it
    2. CV Funkbass X – A funky wah bass sound. Some trickery gives it a designed unstable sound making it seem like your CV has problems!
    3. Super Deep Juno Bass – a multi saw bass. Using stacked voices to get something in the style of a Juno bass, but deeper.
    4. Italian Space Organ – it’s a Farfisa sound with a bunch of weird reverb. Here its demoed with a recreation of a J.M. Jarre Oxygene riff.
    5. 80’s belltones – a classic FM use but here I stack the Operators so one chain handles dissonance / atonality and the other the consonance / tonality.
    6. Strange Piano – its a dark electric piano type sound with analog synthetic overtones.
    7. Crumpen Slammer – it makes feedback distorted guitar type noises when you lift a key.  Well, not really but it’s that kind of sound.
    8. 70s Pad and Lead – Jarre style pad and lead. Powerful mapping allows you to crossfade the voices and play pads and leads with deep control
    9. Traditional Unconvincing Flute – an analog synth style flute.  Occasionally 1970’s era Tangerine dream would use something like this.
    10. Chu’s Store – sample and hold effects – based slightly around Vangelis’s work on Blade runner. Especially Chu’s Store!

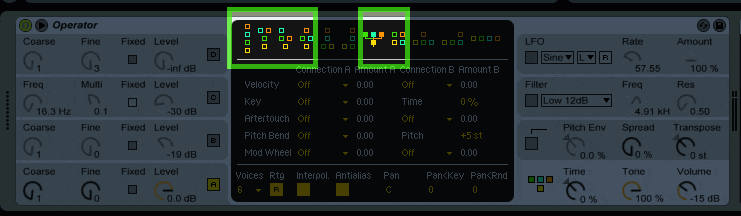
    ableton-op-mockup

    ableton set Download The Free Ableton Live Pack- Xmas Presets

    ALSO Check out the full pack with hundreds of presets / Go and take a listen to the Full LivePack Vintage Operators, which uses Ableton’s Operator synth to make vintage inspired synth sounds reminiscent of the 1970s and 80s

  • Ableton tutorial : PWM in Operator

    Ableton tutorial : PWM in Operator

    Operator is Ableton’s FM synth and while it allows the user to design their own waveforms you might think it’s not possible to do  PWM in Operator, in fact there appears to be no Pulse wave available in Operator so using Pulse Width Modulation to morph from a square wave to Pulse wave seems doubly impossible.

    In fact there is a way to create a pulse wave and also pulse width modulation in Ableton’s Operator synth.  This is possible by using two oscillators out of phase with each other and then harnessing the power of FM.

    Routing of the Oscillators

    Firstly you’ll need to put Operator in any of the the routing modes where oscillators A and B  interact through frequency modulation.  In simple terms any where the Green boox feeds into the yellow box. I’ve indicated any that you can use in this picture.

    op-pwm-routing

    The Basic Waveform

    Choose the basic waveform of a squarewave, as indicated below.

    op-pwm-1The square wave I used is the one with the D next to it which indicates “Double” or 128 partials, in simple terms this means it’ s the most detailed square wave that Operator can manage. ensure that the little “R” for re-triggering is activated, this means we’ll have a reliably consistent wave output that starts at 0 every time.

    You can see that in my example I’m using a Max for Live oscilloscope by Jonas Obermeuller in order to show you the wave output, I’d suggest you also use an oscilloscope plugin of some kind to help you craft the sound. Any will do. If you have M4L you can grab the same one that I used.

    The Second Oscillator makes a Pulse

    Now, we add in the modulator waveform in Oscillator slot B. here again I use the square wave with the D next to it and again ensure that the retrigger is active, but here we use the phase offset to set a 25% offset . It’s equally important to set the volume of oscillator B to -22db

    Operator PWM - pulse wave

    If you have an oscilloscope active you should now see a pulse wave, a narrowed square.   If this is not the case check the previous steps and images carefully.

    Now, try turning the volume of oscillator B  down from its -22db position, listen and watch the oscilloscope.  You will hear and see the disctinctive pulse width modulation as the pulsewave morphs smoothly to a square wave and back (as you return the Oscillator B volume to -22db)

    Create Modulation

    So, all we have left to do is to automate this volume control by use of the LFO.  Copy the settings in this image carefully

    Ableton Operator PWM modulation Notice that all of the LFO “Destination A” settings are deactivated and we are instead using the “Destination B” section to route 100% of our modulation signal to the Oscillator B volume.

    Now you should hear the sound of LFO modulated pulse width modulation in Ableton’s Operator.

    Ableton Operator PWM


    This is just the start of creating bold new unexpected sounds in this powerful little synth. Try dropping the Coarse pitch oscillator B to create a rich complex waveform.