Ableton Operator is a small FM synth which comes with Ableton Live Suite. Operator may seem limited to familiar traditional FM sounds but it is capable of much more. Here I show thirteen advanced tips and a few ways to use Operator’s lesser known features to create bigger sounds. and a few you might not expect, ranging from deep rumbly analog-style basses, evolving leads and pads.
1: Make oscillators morph from sine to “sawtooth”

The oscillators can be set in various FM modulator / carrier routings, but if an oscillator has no modulator input then the oscillator feedback parameter becomes available. Setting an oscillator waveform to sinewave and turning up the feedback parameter will feed the sine wave pitch back on itself and you will hear the sine morph into a waveform which sounds and looks quite similar to a sawtooth.
This waveshaping effect is is dependent on the oscillator amplitude (as amplitude induces feedback), so turning the oscillator up will take the waveshape closer to a “Saw”, turning it even higher will make it distort toward noise, and turning the amplitude right down will take the waveshape closer to the original sine.
The oscillator amplitude is obviously affected by its (amplitude) envelope and by all the other modulation sources mapped to oscillator amplitude – LFO, Aux envelope, modwheel, after touch, etc. meaning you now have deep control over the waveshape of these oscillators.
Of course – morphing a sawtooth wave into a sine wave is very similar to what a lowpass filter does it removes high harmonics – but the benefit here is that each of the four oscillators can independently vary from saw to sine, as if you had 4 independent filters (or 5 if you count the filter itself !). Additionally the smooth interaction between volume and waveshape gives a good almost natural physical modelling feel to the waveform. It’s a unique sound.
2: Invert harmonics for hard to reach waveshapes (a Triangle wave)
 Operator has a very handy method of drawing your own waveshape with partials and you will be able to get clues for how common waveforms look as harmonics by studying the built in waves. Not all waveshapes are possible with the basic approach. The reason for this is that harmonics also have a phase relationship, a fundamental might be oscillating up while the third partial is oscillating downwards (180 degrees out of phase). This is the case with the humble Triangle wave.
The basic additive waveform drawing system of Operator does not allow for drawing harmonic phase relationships but we can emulate out of phase partials by using a second oscillator with a waveform phase offset. 50% of offset is 180 degrees of phase difference.
A triangle wave contains the same odd numbered partials as a square wave – yet is plainly very different in sound. In a triangle wave the phase of the upper partials is 180 degrees out of phase with the fundamental. You can see in this image that Oscillator A is handling one group of harmonics (1,5,9,…) and the second oscillator (B) is taking care of the harmonics which are inverted. Combining these two oscillators together allows us to create a waveform with harmonics with relationships which are out of phase with each other. In this case we make a Triangle wave, but the same principle allows other (otherwise unavailable) waves.
Notice that PHASE INVERSION on the B oscillator which is what makes our complex triangle output.
Triangle / Square wave morph

In the above GIF we can see what happens if we make oscillator D a copy of oscillator B but turn in Oscillator D make sure to reset the phase parameter of that oscillator down to 0, and then by using the LFO to crossfade between these two variations (B and D) the wave changes between a triangle and a “square”. the same principle can be used to create more complex harmonic shifting effects. See tip 5 for more on this.
4: Pulse Width Modulation in Operator
It may seem impossible to get the PWM sound from the static oscillators of operator but in fact there is a way to create a pulse wave and also pulse width modulation in Ableton’s Operator synth. This is possible by using two oscillators out of phase with each other and then harnessing the power of FM. The full tutorial can be read here Ableton tutorial : PWM in Operator

5: Make complex evolving sounds with additive synthesis
A real world instrument has harmonics which are all very mobile, they don’t stay static in sustain, and they don’t all simply “filter” down when they decay. This harmonic mobility is one of the things which give sounds a little life and sparkle.
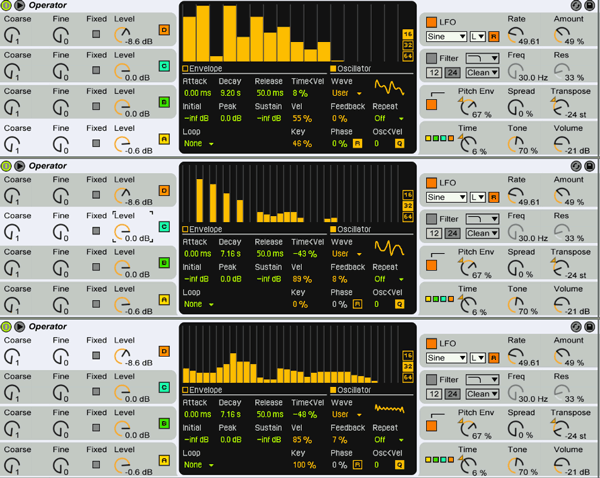
A real world instrument has complex harmonic relationships so that when playing a note we might hear the 2nd harmonic, the 5th, the 8th and the 13th all fluctuate in volume in a relationship, while the root, 3rd, 6th all might share commonalities. You can make Operator waveshapes more mobile in this way by splitting the partials of a basic waveform like a sawtooth and putting them on several oscillators and then automating the amplitudes differently for each oscillator.
In this simple example a sort of harpsichord sound is produced by 4 different harmonically related oscillators each with different envelopes, different velocity responses, etc. A more complex example would deliver more complex shifting amplitude relationships between the harmonics.
6: Get a more “analog” sound by deactivating the oscillator phase retriggers
Operator is usually set so that each waveform resets to zero on each keypress, this is controlled by the little [R] button next to the phase percentage parameter. When the Phase Retrigger switch is active the wave starts on 0db and cycles up and then down. However: in almost all analog synths the oscillators are free running meaning they play all the time and the sound is only let out by the opening of the amplitude envelope. Analog synths often do not to reset the phase on keypress, and this is one of the many factors which give analog synths a more varied sound.
So if you want to get a little more “analog” movement in your Operator patches disable the phase reset. Pitfalls: you may hear clicking on each key press, especially with bass sounds – that’s the reason the oscillators DO default to reset – to avoid clicks. So it’s a trade off, you can have a fatter and more mobile unpredictable sound, or a precise repeatable attack. Usually if you want fatter sounds then you can simple add a tiny bit off slow attack on the amplitude envelope to hide the clicks.
This example uses two Operators, one panned slightly left the other slightly right. The 8 oscillators phase reset switches are deactivated, you should be able to hear that the notes do not sound the same as the pattern loops around. This is because each oscillator is not phase locked to its peers. This makes the sound more varied and less like a sample.
7: Sacrifice an Oscillator to gain another LFO
Operator is an FM synth, where a modulator oscillator drives a carrier oscillator. The difference between the pitch of the carrier and modulator will produce sidebands and lots of harmonics. But its possible to use a modulator oscillator at a much lower frequency, and unmapped to the keyboard it becomes a very flexible pitch LFO. This means you can have two Oscillators, each with their own unique pitch LFOs, and then use the main LFO for additional modulation (for example more pitch wobbling, or just on the filter cutoff)
8: Hidden waveshaping
In Operator when we usually route one oscillator to another it is to produce FM synthesis. The usual setup would be with both oscillators tracking the keyboard, and the differences between the carrier and modulator frequency ratios producing the additional harmonics and familiar FM tones.
But if you set the carrier oscillator to be Fixed pitch, and turn both frequency and multiplier down to the lowest values you will see that the carrier waveform is now static. With this static carrier in place any modulator passing through will be waveshaped by it. Routing a normal key-tracked oscillator through this static fixed oscillator will cause the input wave to be dynamically shaped by the fixed wave depending on the modulator amplitude. The image below shows how changing oscillator B amplitude will alter the waveshaping in a way quite different from a traditional FM outcome.

9: Variable curve filter envelope – using the aux env
Each operator amplitude envelope has fixed curves, but the pitch and filter envelopes both have more flexible curves. Sometimes you may find that you want a more complex amplitude shaping than a simple logarithmic decay shape – and that’s when you will want to make use of the Pitch (or Auxilliary) envelope to map to either the specific Oscillator amplitude or the global volume. Using the curve shapes of the Auxiliary envelope gives you much more control to make things like snappy basses, or attacks with a precisely controlled fast curve which is useful for making acidic or Moog style bass sounds with high resonance. But in addition to that you should realise that you are really stacking volume envelopes on top of each other, the original Oscillator amplitude envelope and the auxiliary – and that means looping envelopes can overlay to make fun repeating figures.
10: The fifth operator – key tracked LFO
Operator has 4 very precise FM oscillators which follow the predefined algorithm routings set in the editing tab at the bottom right called the “Global Shell” (sounds cool eh!).
What many people don’t realise is that by setting the LFO to track keyboard pitch turns it into another FM modulator, but this one can be mapped more freely. Set the LFO to Sine, H, R, rate:60, Amount 100% for a start.
- You can now send the LFO Operator to the pitches of oscillator A, B, C and D simultaneously to create new routing algorithms.
- You can also send it to the volume parameter to produce a cross-modulaton effect
- You can send it to the A/C parameter which will quickly switch between oscillator A and Oscillator C to create wave morphing effects
11: “repeat” makes harmonic editing less fiddly
Operator has a very fun (for audio nerds) harmonic/partial editing interface which allows you to make your own waveforms. Simple waveforms can be made with the interface set to 16 partials, but if you wish to make a complex wave with a lot of partials the interface becomes fiddly and difficult to control – often resulting in raspy sounding waves. Fortunately there is a trick to get around this: The repeat pulldown. Set the waveform editor to show 16 partials and underneath where the waveshape is displayed you’ll see a pulldown called “Repeat”, this activates a repeat of the first 16 partials with increasing fade of volume.
12: Stack Operators to get fatness
Now, you might say “duh” and “obviously” but – if you rack 2 Operators all set to the parallel (No FM ) algorithm, all set on saws … then you have yourself 8 detunable saws. And 8 detuned saws sounds quite fat if you route them through a nice (Cytomic) overdriven filter-model. You will get something that is equivalent to the finest Rave-Hoover sound.
Polyphonic portamento tricks
Some analogue synths have a unique portamento sound where each oscillator has a different glide speed which means 4 oscillators all arrive at their destination at different times, a nice sound. You can replicate this by making an Operator with one oscillator active, put then duplicate it 3 times and alter the portamento speed slightly for each Operator.
Intermodulation effects
If you want a really mashed together overdrive sound I recommend that rather than using the filters of the two Operators that you place an Autofilter after the two stacked Instruments. The reason is something called “intermodulation”, overdrive and distortion take the sum of all the harmonics presented at the input and intermodulate them to produce new harmonics. That’s what happens when an electric guitar presents two strings to a distortion, they intermodulate. It’s a unique sound
13: Triggered Envelope on a second filter (on stacked Operators)
Now if you followed that last note about intermodulation effects and have tried an overdriven filter across your entire rack output you’ll notice that you now have no real control over that filter’s envelope. Sure you have 8 oscillators into a distorting filter – but If you want envelope control of that filtered 8 sawtooth stack then this is how you do it.
Make a silent chain in your rack and title it “CV”. Put an Operator in there with a plain old sine wave, and set the volume envelope and velocity of this however you would like your eventual filter envelope to be shaped. Short and snappy, or long and evolving. Now … MUTE THIS “CV” CHAIN
Next – drop your AutoFilter across the output of the entire rack and set its Sidechain to pull from the same track, and from the Post FX of the CV chain. So below you’ll see the sidechain pulling from ” Fat Saws – CV”. What happens here is the AutoFilter will observe only this very precise envelope and you can set up quite snappy filtered distortions, reverbs, echos, etc. whatever you want.

You can put the CV envelope into loop mode for rhythm effects, you can make it’s volume key track and plenty more.
That’s enough confusing and badly explained tips for now. Tune in next time for my Margarita recipe.