Overview of this tutorial
In this Ableton tutorial we’ll take a look at the Ableton Looper and how a hidden feature can enable it to become more of a creative tool for producing unique pads and effects.
This is the second in a series exploring the creative power of feedback in Ableton Live. In the first in this series Feedback in Ableton Live – making a “dub delay”, we learned how to activate the feedback mode of Ableton Live’s effects return channels and to use Ableton devices to shape audio in a feedback loop, it might help you to read that tutorial before this one, but it’s not essential.
In this tutorial we’ll look at carving the frequencies within a long loop to produce unique sounds.
I will show how we can take a simple Sawtooth wave like this
and use loop frequency carving using only an EQ to boost and reduce harmonics, and a saturator to add related harmonics to turn that simple sound into something very different.
About the Ableton Looper effect insert
The Ableton Looper device has an effect insert which enables us to place effects within the Looper feedback path. In the Live manual there is a small and mysterious section regarding the looper entitled “22.21.1 Feedback Routing”. and it is described like this :
“…[it] allows you to, for example, create Looper overdubs that continually feed back
through another track’s devices.
If you have followed the previous tutorial you’ll remember how we used a delay effect and inserted our own effects within the feedback path in order to shape the sound.
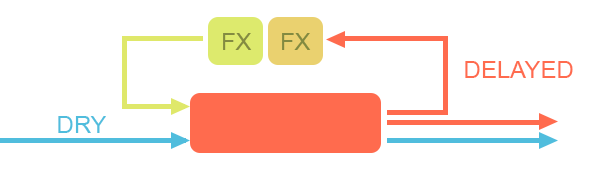
In this feedback effecting loop any changes the changes are iterative, this means if we sweep a filter inside the audio feedback loop that filter sweep sound will come back around as feedback and we can layer different filter sweeps onto the looping sound. Iterative changes to the sound in the loop mean we can carve the sound harmonically by listening and changing to our requirements. We can put effects an EQ inside the feedback path, and use them to shape the sound. We can reshape the harmonics which make up waveforms so we can create a noise which moves from a sawtooth to a square wave (for example)
In the previous tutorial we worked in the Ableton Effect return channels and these require us to send our sound source off to the effects section – but the looper can exist anywhere, and its feedback insert feature relies on the track routing boxes – so lets begin making our turbocharged looper feedback loop.
Step One – create an instrument track with a Looper
Create a MIDI track and place an Operator device on it, followed by a Looper. You should match the Instrument and Looper settings to those pictured here.

If you do not have access to Operator any synthesiser with a basic sawtooth waveform will do. We use a sawtooth waveform because it contains all of the odd and even numbered harmonics and this makes it a perfect starting point to carve out our resultant sound. For example we might choose to slowly remove all of the even numbered harmonics from our looping sawtooth leaving only the odd numbered ones – and that would give us a morphing sawtooth-square wave!
The instrument needs to have a slow attack and release on the amplitude and no filter activated.
In my example the MIDI track is titled “Operator” and that name will help us identify the track in the next step.
Step Two – create the Loop insert channel
Create a new Audio track and title it “Loop insert”, open up the In-Out section so you can see the track routings, if it is not already visible you will find the show/hide In-Out button over on the right side of the interface, it’s a tiny little circle marked “I.O”.
make your Loop Insert track’s IO look like this, notice that the Loop Insert track’s volume is set to -6db, this is important.
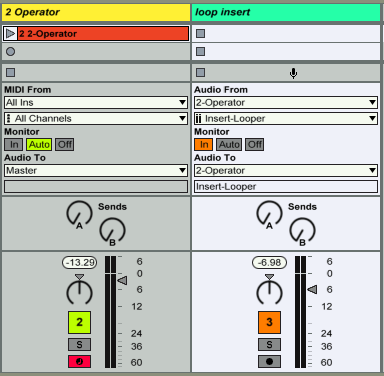 Notice that in the the Audio From section of Loop Insert I have chosen “2-Operator”, and in the pulldown immediately beneath I have chosen “Insert-Looper”. In the Audio To section I have chosen “2-Operator”.
Now we ought to check if the routing is working before we proceed so … Flip over to your instrument channel and play a note or two with Operator, if you can hear something from Operator that’s a good start. If you can’t hear anything take a look at the Looper’s Input-> Output pulldown and set it to “Always”
Now press play to start the Ableton transport running and take a look at the Looper, hopefully that has started and appears to be following the main Ableton BPM. If it seems to slow or too fast, ensure the Tempo control is set to “follow song tempo”
Play a note from Operator and if all is going well you should hear the note repeat after a couple of bars, and the note should slowly fade away. If the note does not repeat – check that your Loop Insert channel Monitor section is set to “Monitor:In.”
Once you get the basic looping fade, proceed to the next step.
Step three – Loop Insert effects
On the Loop Insert channel is where we can interfere with our loop. Here we can drop effects in and twiddle with them and whatever we to the sound will come back around the next time the feedback loop returns.
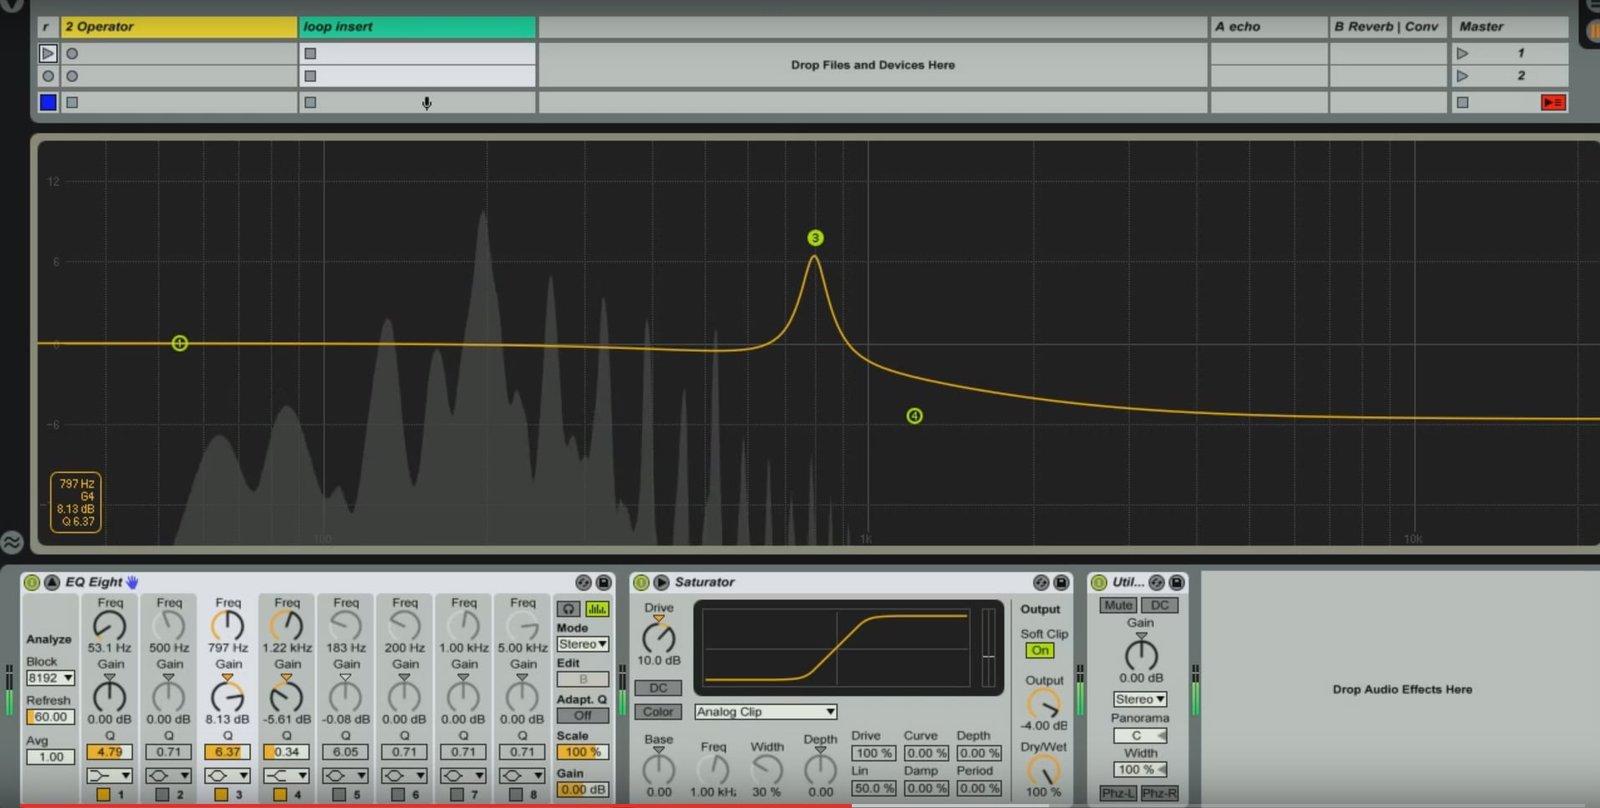
I suggest inserting this basic toolkit. An EQ8 and a Saturator with these settings :
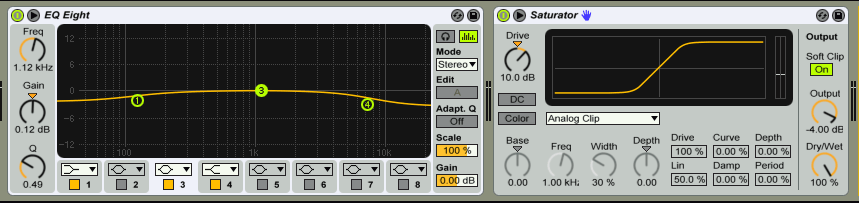 The drive of the saturator is set to +10 db and the output of the Saturator is set to -4 db, the reason for this is that these two will combine to create +6db of signal boost (saturated). If you have correctly set the Loop Insert channel fader to -6db that will add up to 0db of boost. That means the signal will be saturated, but not increase or decrease in volume.
Why choose an EQ and a Saturator?
An EQ8 can remove existing harmonics, or it can boost existing harmonics so the usefulness of this device should be obvious in this context. A saturator will add related harmonics where there are none – so even if we started with a simple sine wave at 100hz – by using a Saturator we could create harmonics for our EQ 8 to work with.
By choosing an EQ8 and a Saturator we have a good simple toolkit to amplify and attenuate existing and to create harmonics where there currently are none.
Step four – Sculpting sound
Now the fun begins! What we are going to do is iteratively carve and sculpt the audio feedback each time it passes around, this means that every filtering or tweaking of the audio will be cumulative. We can add sound in frequency ranges where there is no sound, and take away frequencies too. Carving and sculpting the audio.
For a nice rich source of harmonics to try this out on I recommend setting your synth to output a sawtooth wave, and for the amplitude envelope of the synth to have a slow attack and decay. Around 4 seconds for both will do it.
Perhaps the simplest way to examine how to carve sound with the setup you just created is to watch this video of me “performing” the system.
Here I play a sawtooth wave into the loop and switch to the EQ of the feedback loop channel, where I now have realtime access to the harmonics of the sawtooth. I can increase or decrease their volume, I can make harmonics from (near) silence, and I can wobble the harmonic to create variation.
The outcome shown in this video below is a basic demonstration of controlling the harmonics in a loop, for resynthesis. It should help you understand the potential of this method to create new and unusual sounds.
As soon as you have a loop you like you can drag it out of the looper and into a new Audio track, this way you will collect a bunch of looper takes which are harmonically related and the resultant soundbank can be assembled or selected from to form the basis of anything from ambient masterwork, a movie soundbed, or a rhythmic pumping technological atmosphere.